You’ve just launched your online store on Shopify, stocked with a diverse range of products. As orders start pouring in, you realize that the Shopify shipping setup isn’t as straightforward as you thought. Some products are bulky and require different shipping rates. While others are lightweight and can be shipped internationally at a minimal cost. How do you manage these varying shipping rate requirements without causing confusion or overcharging your customers?
This is where Shopify Shipping Profiles come in.
Shipping profiles play a vital role in e-commerce. It helps businesses set appropriate shipping rates based on product type and destination. Whether you’re new to Shopify or have been using it for a while, it’s essential to understand how to set up and manage these shipping profiles properly. In this guide, we’ll explain the difference between general and custom shipping profiles and provide a step-by-step process for setting them up.
Setting up Shipping Profiles
Shipping profiles in Shopify are designed to help merchants manage and organize their shipping rules for different products and destinations. They act as a framework that determines how much customers pay shipping rates for specific products they purchase and where they want them delivered. Here’s a breakdown of shipping profile settings:
General vs. Custom Shipping Profiles:
General Shipping Profile: This is the default profile that applies to all products in your store. It’s designed for businesses with a uniform shipping rate across all their products. For instance, if you charge a flat shipping rate for any product, regardless of size or weight, you’d use a general shipping profile.
Custom Shipping Profiles: These are for businesses that need different shipping rates for specific products or groups of products. For example, if you sell both books and furniture, you might want to charge differently for shipping each due to the vast difference in their weight and size. Custom shipping profiles allow you to set these specific shipping rates.
How Shipping Profiles Work:
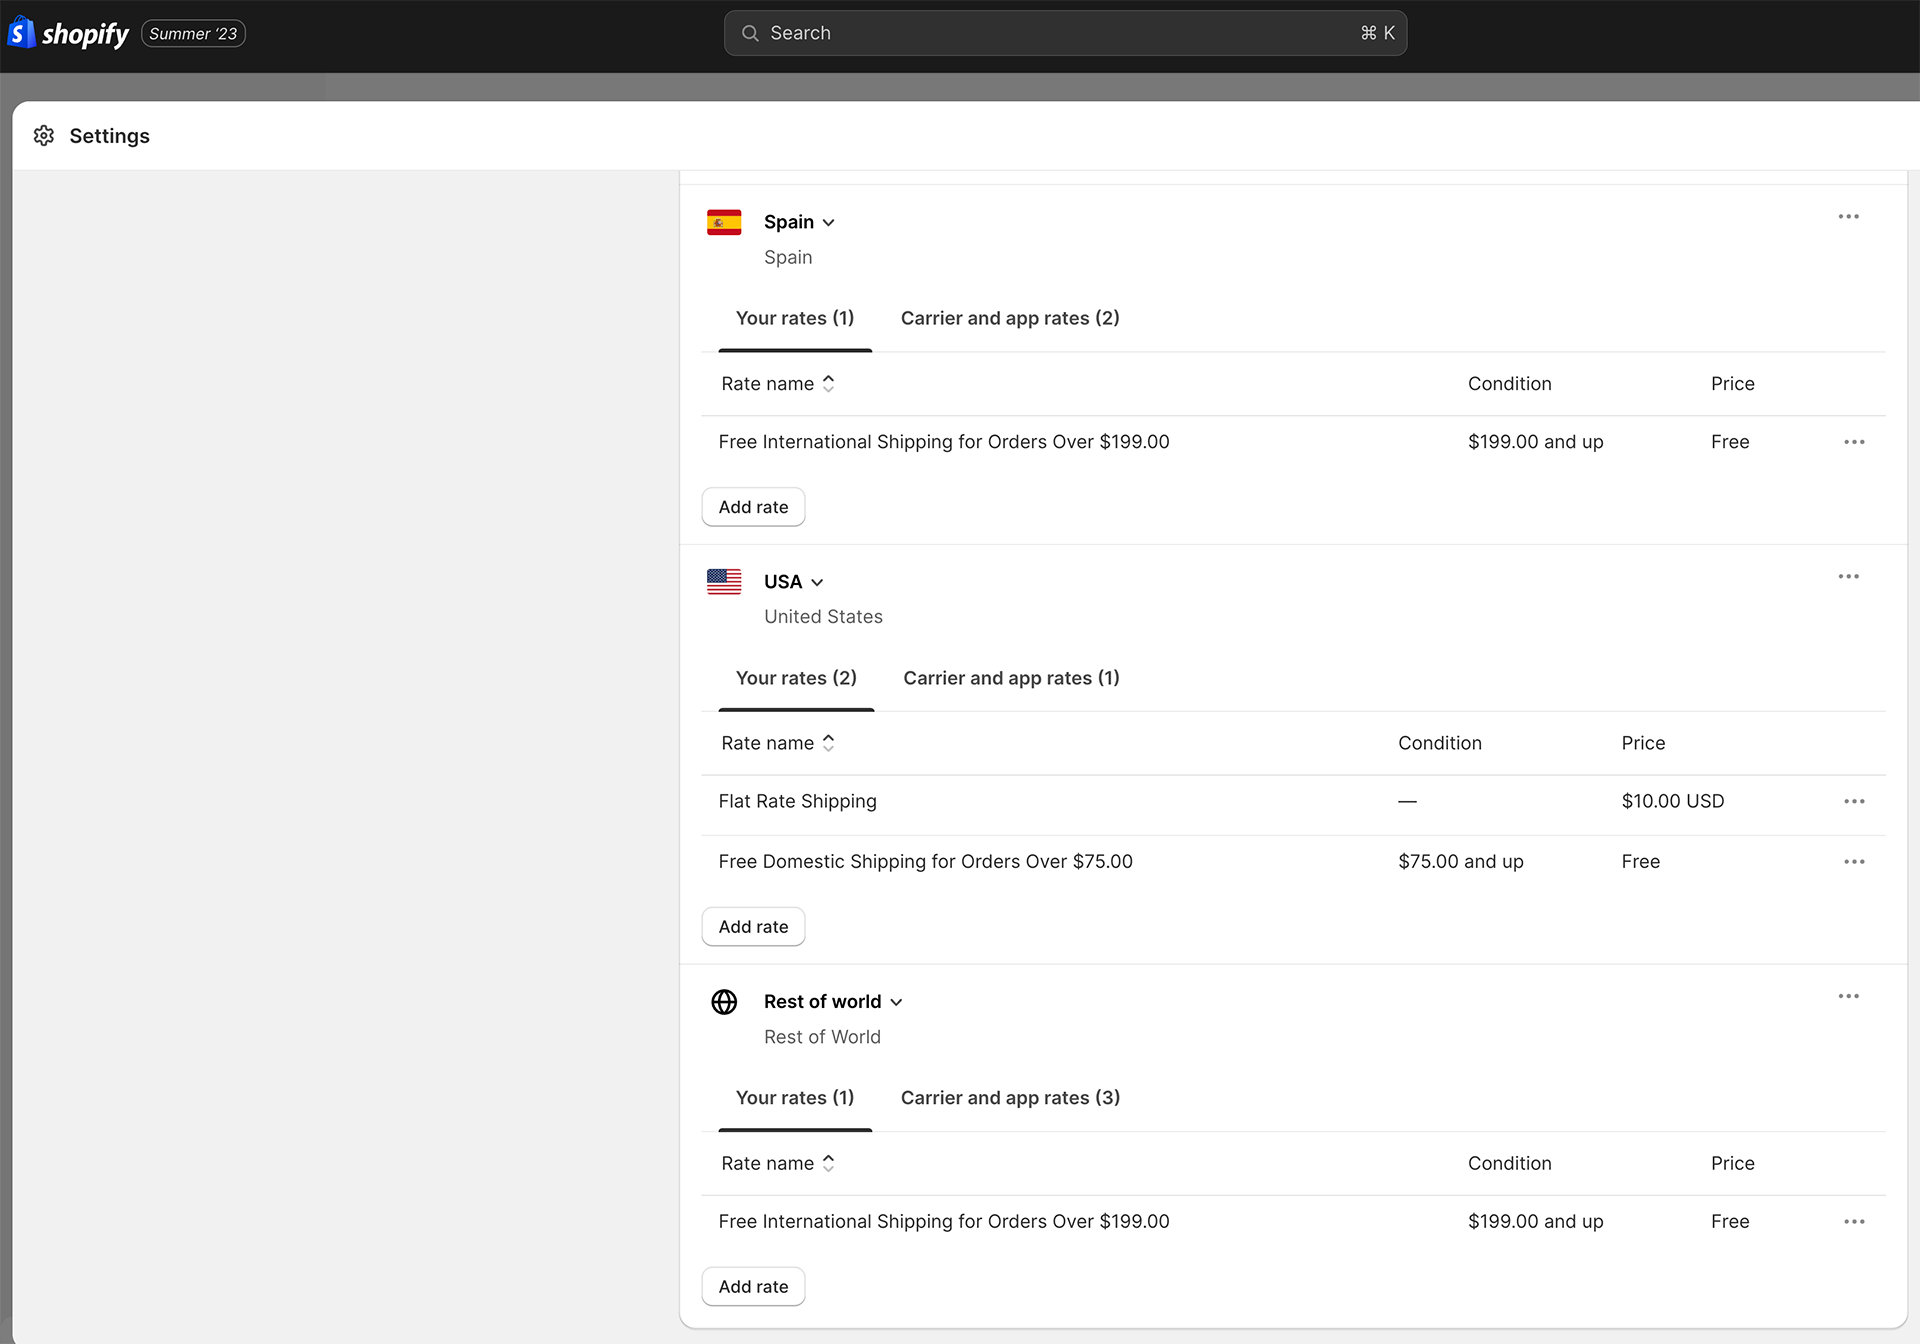
Each shipping profile contains sets of shipping rules based on locations, known as shipping zones. Within these shipping zones, you can specify different shipping rates.
When a customer places an order, Shopify checks the product’s assigned profile and the customer’s shipping zone. It then calculates the shipping rate based on the rules you’ve set in that shipping profile.
Flexibility and Control Managing your Shipping:
Shipping profiles give you the flexibility to offer various shipping options and new services, such as express delivery, standard delivery, or free shipping over a certain purchase amount.
They also control which products are available for shipping to specific locations. For instance, you might have products that you only ship domestically and others that you ship internationally. With custom profiles, you can set up shipping rules easily.
In addition to managing your shipping profiles, product descriptions are also essential, especially if you’re in the dropshipping business. Crafting compelling product descriptions can be challenging, but it becomes a breeze with the right tools. Our guide on creating dropshipping descriptions using Chat GPT is a modern approach that leverages AI to generate captivating content for your products.
Factors to Consider while Setting Up and Managing Shipping Profiles

Setting up shipping profiles on Shopify is more than just inputting rates; it requires a strategic approach to ensure efficiency and customer satisfaction. Here are some key factors to consider:
Shipping Zones and Rates:
Before setting up profiles, familiarize yourself with the concept of shipping zones. Each location or region you ship to can be categorized into different shipping zones, and each zone can have its distinct shipping rates.
Determine the shipping rates for each zone based on factors like distance, product weight, and delivery speed. Optimizing shipping zones specifically is made easier with the Shopify Shipping Zones Guide.
Integration with Fulfillment Apps:
If you’re using third-party apps for order fulfillment, be aware that some can automatically add locations to your shipping profile. This can affect your shipping settings, so always review any auto-changes these apps make.
Multiple Product Orders:
Consider how you’ll handle orders containing specific products from different shipping profiles or locations. Shopify combines shipping rates for each product to provide a single rate at checkout. Ensure this combined rate is fair and doesn’t overcharge the customer.
Product Restrictions:
Remember that a product or its variant can be added to only one shipping profile at a time. Plan your profiles accordingly, especially if you have products with multiple variants.
Access and Permissions:
If you have a team managing your Shopify store, consider who needs access to your shipping profiles. Staff members or collaborators might require permission to view or modify shipping settings. Ensure you grant the necessary permissions without compromising security.
Customer Expectations:
Always keep the customer’s perspective in mind. Transparent and fair shipping rates can enhance customer trust and loyalty. Avoid surprise charges and ensure the final shipping rate is communicated clearly at checkout.
Regular Review and Updates:
Shipping needs can evolve. Regularly review your shipping profiles to ensure they align with current business strategies, product additions, or changes in shipping regulations.
Setting Up Your General Shipping Profile
The General Shipping Profile in Shopify is a default profile that applies to all products in your store unless specified otherwise. It’s handy for businesses with a consistent shipping rate across all their products. Here’s a step-by-step guide to setting it up:
Access Shipping Settings:
- Log in to your Shopify admin dashboard.
- Navigate to the left sidebar and click on “Settings.”
- From the dropdown menu, select “Shipping and Delivery.”
Manage General Shipping Profile Rates:
- Once you’re in the “Shipping and Delivery” section, you’ll see a “General shipping rates” section. Click on “Manage” to access it.
Update Shipping Origins:
In the “Shipping origins” section, you can make any necessary changes to your locations. This is where you specify from where your products will be shipped. Ensure the address and details are accurate, as they affect shipping calculations.
Set Up Shipping Zones:
For each shipping zone, you want to include in your profile:
- Click on “Add shipping zone.”
- Name the zone for easy identification (e.g., “Domestic” or “International”).
- Select the countries or regions that are part of this shipping zone. This determines where you’re willing to ship your products.
- Once the zone is defined, you must add the shipping rate. Click on “Add rate” and specify whether it’s a flat rate based on weight or order price. Input the necessary values.
Save Changes to General Shipping Profile:
Make sure you click “Save” after setting up your zones and rates so all your changes are saved.
By following these steps, you’ll have a General Shipping Profile in place that applies consistent rates across your product range. It’s a foundational step in Shopify’s shipping setup, ensuring that, at a minimum, all products have a default shipping rate associated with them.
Creating a Custom Shipping Profile
Custom Shipping Profiles in Shopify allow merchants to set specific shipping rates for distinct products or groups of products. This is especially useful when certain products have unique shipping requirements due to factors like size, weight, or destination restrictions. Here’s how to set up a Custom Shipping Profile:
Access Shipping Settings:
- Start by logging into your Shopify admin dashboard.
- Go to the left sidebar and select “Settings.”
- From the options presented, choose “Shipping and Delivery.”
Initiate Custom Profile Creation:
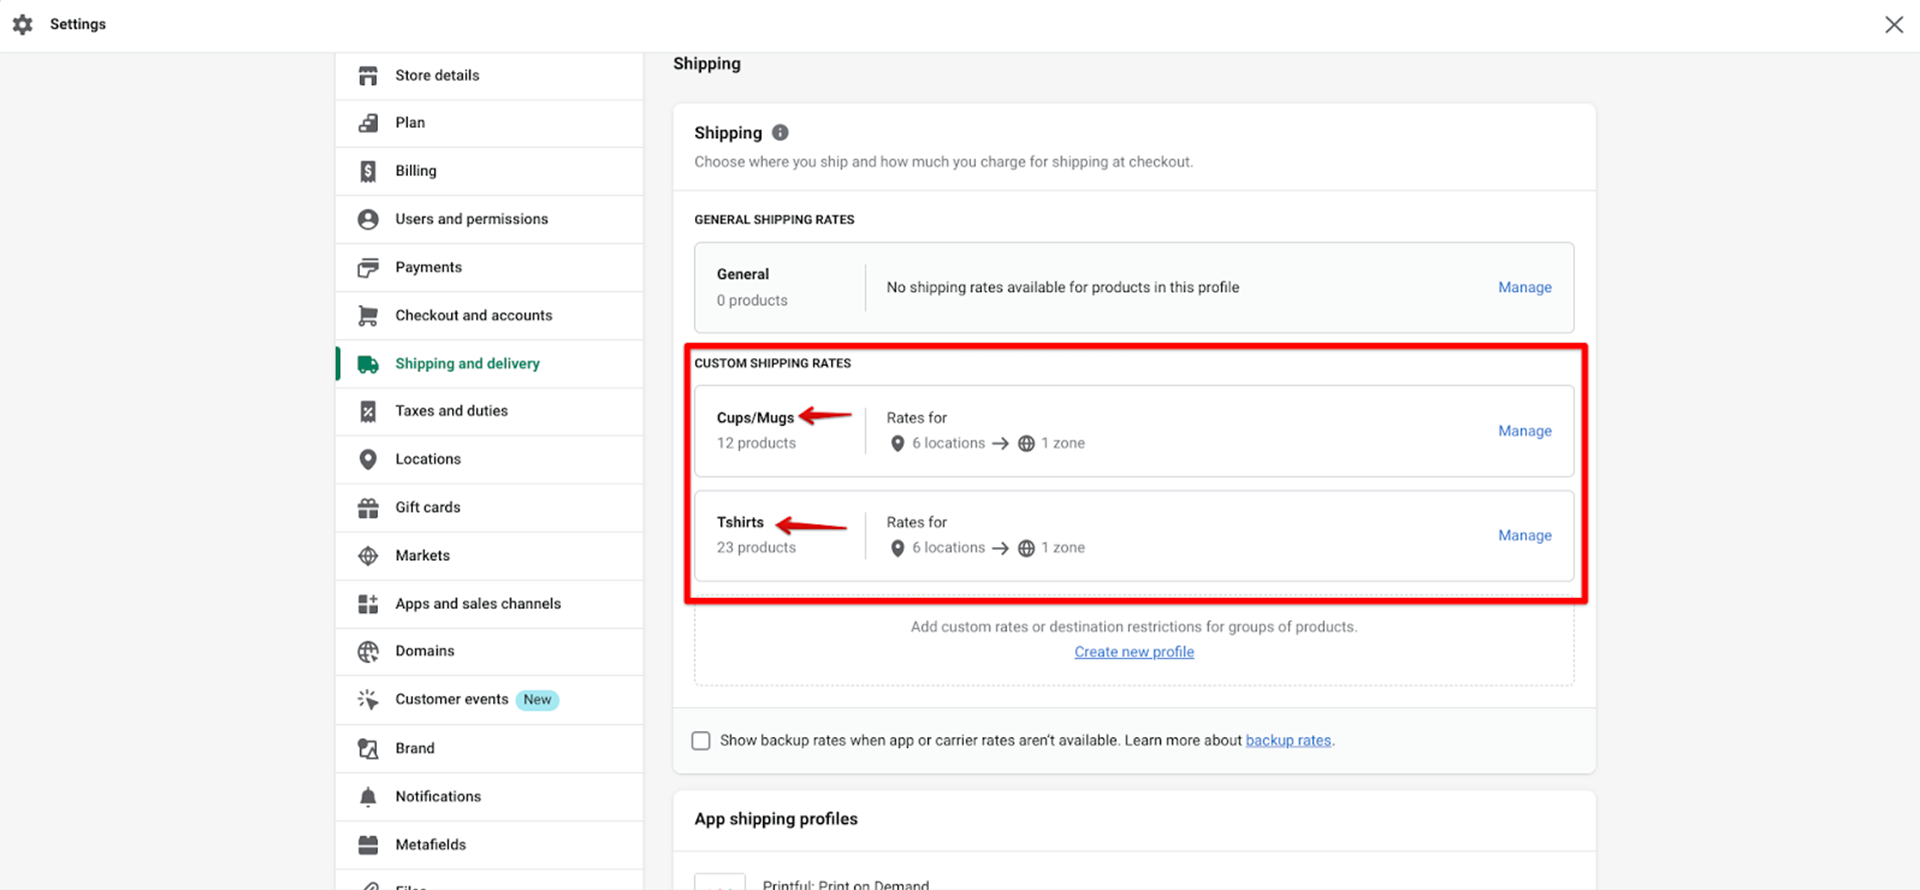
- In the “Shipping and Delivery” section, locate the “Custom shipping rates” area.
- Click on “Create new profile” to begin the process.
Name Your Profile:
- A prompt will ask you to provide a name for your custom profile. Choose a name that clearly represents the products or conditions this profile will cover, such as “Heavy Items” or “Fragile Products.”
Assign Products:
- In the “Products” section of the profile creation page, click “Add products.”
- A list of your store’s products will appear. Select the products or product variants you want to include in this custom profile.
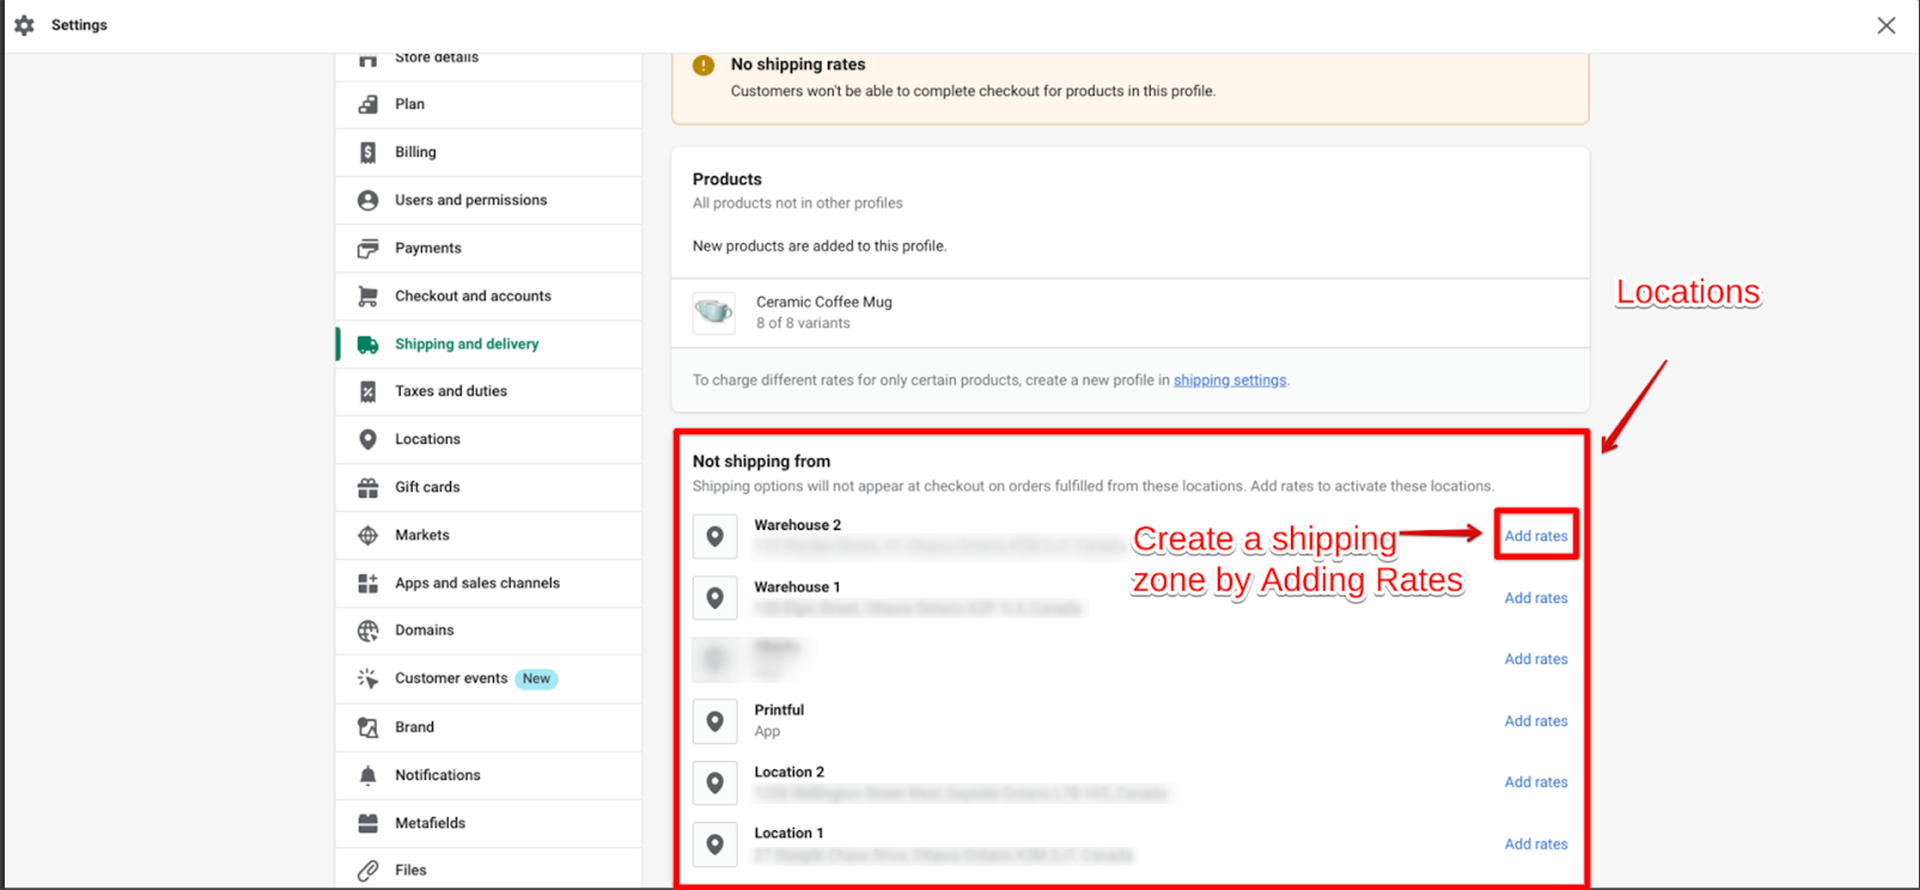
Adjust Shipping Origins (if necessary):
Under the “Shipping origins” section, make any required changes to your locations. This is crucial if certain products are shipped from a different location than your general inventory.
- Define Shipping Zones and Rates:
- Just like with the General Shipping Profile, you’ll need to specify zones for this custom profile:
- Click “Add shipping zone.”
- Provide a name for the zone.
- Choose the countries or regions included in this zone.
- After defining the zone, click “Add rate” to set the shipping cost. This can be a flat fee, weight based shipping rates, or an order price-based rate. Fill in the necessary details.
Finalize and Save:
- Once you’ve completed all the steps, ensure you review the details for accuracy.
- At the bottom, click “Save” to complete your shipping profile.
With your Custom Shipping Profile in place, you can now offer tailored shipping options for specific products, ensuring that your shipping rates are competitive and reflect the actual costs involved. Regularly review and update these profiles as your product range and shipping needs evolve.
In Summary
Shipping is a crucial aspect of e-commerce. It’s not just about delivering a product but about ensuring it’s done efficiently and at the right cost. With Shopify’s Shipping Profiles, sellers have a straightforward tool to manage shipping rates and rules.
By setting up and managing these profiles correctly, businesses can offer clear and fair shipping rates to their customers. As you continue to grow your online store, remember to review and adjust your shipping strategies regularly. Doing so can improve customer satisfaction and help your business run smoothly.
While Shopify offers an integrated shipping solution, you may need a more custom solution or something that stands out from the crowd. If you want to elevate your e-commerce presence further, consider exploring Rezolutions Design’s specialized e-commerce builds.